Sunday, November 29, 2015

User Provisioning in WSO2 IS


WSO2 Identity Server 5.0.0 supports Inbound provisioning, Outbound provisioning and Just-In-Time provisioning. In this post, I'll walk you through these provisioning concepts.

Inbound provisioning

Inbound provisioning provisions users to the Identity Server from an external system. WSO2 Identity Server supports inbound provisioning via SOAP based APIs as well as SCIM APIs. When using inbound provisioning, the users will be created in primary or secondary user stores.


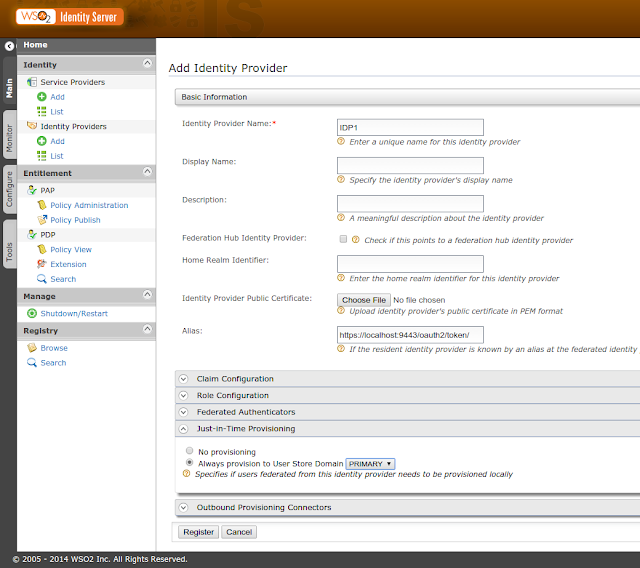
Just-In-Time provisioning (JIT)

Just-In-Time provisioning will provision users to the Identity Server by the time the user is logging from an external Identity Provider. You can point to the user store which needs to be populated with the JIT provisioning.


Outbound provisioning

Outbound provisioning provisions users from Identity Server to trusted Identity Providers. WSO2 Identity Server supports outbound provisioning via SCIM, SPML, SOAP, Google Apps provisioning API, Salesforce provisioning API. 


You can go through this blog post for detailed information about the authentication framework.


Installing Web logic 12.1.2 in IBM AIX

Prerequisites

JDK 1.7 or above
wls_121200.jar downloaded (download the jar from here)

Installation Steps

Type the below command from the location where the jar file exists.

java -jar wls_121200.jar


Give the location you need to install Web Logic.


You can finish up the installation by clicking the finish button.

Configuring Web logic 12.1.2

Navigate to ORACLE_HOME/oracle_common/common/bin directory. Start the graphical configuration wizard as follows.

./config.sh


Provide a username and a password for your administrator account.


Provide the JDK path.


Starting the Web logic server


Access the server using the following URL.

<ip_address>:7001/console


Sunday, November 22, 2015

Configuring IBM AIX 7.1 with IBM JDK 1.6


1. Download IBM SDK 6 for AIX 7.1 using the below link.

https://www.ibm.com/developerworks/java/jdk/aix/service.html

You will get the Java6_64.sdk.6.0.0.385.tar file.

2. Extract the tar file using the following command.

tar –xvf Java6_64.sdk.6.0.0.385.tar
You will get the Java6_64.sdk file.

3. Start the installation using the below commands.
inutoc .
smitty installp


4. You will get a menu to select items. Install software is selected by default. Press enter to continue the installation.


5. Enter the directory for software as ./


6. Select "ACCEPT new license agreements?" from the up and down arrows. Press tab key to change the text to "yes".


7. Hit enter to start installation.


This will install the IBM jdk on your AIX OS.


Wednesday, November 18, 2015

Extracting a .zip file using unzip command in IBM AIX


Unzip utility is not installed in IBM AIX by default. And also it can not be installed using apt-get, as we do in Linux OS.

Here is a step by step guide to install unzip in IBM AIX.

Step 01

Visit http://www-03.ibm.com/systems/power/software/aix/linux/toolbox/alpha.html and download the rpm for unzip. (unzip-5.51-1.aix5.1.ppc.rpm )

Step 02

Run the following command to install unzip feature in AIX

rpm -ivh unzip-5.51-1.aix5.1.ppc.rpm

You will get the following output.

l490vp017_pub[/home/u0013155] > rpm -ivh unzip-5.51-1.aix5.1.ppc.rpm

unzip                       ##################################################

Step 03

Type unzip and check whether it is installed correctly.

l490vp017_pub[/home/u0013155] > unzip
UnZip 5.51 of 22 May 2004, by Info-ZIP.  Maintained by C. Spieler.  Send
bug reports using http://www.info-zip.org/zip-bug.html; see README for details.

Usage: unzip [-Z] [-opts[modifiers]] file[.zip] [list] [-x xlist] [-d exdir]
  Default action is to extract files in list, except those in xlist, to exdir;
  file[.zip] may be a wildcard.  -Z => ZipInfo mode ("unzip -Z" for usage).

  -p  extract files to pipe, no messages     -l  list files (short format)
  -f  freshen existing files, create none    -t  test compressed archive data
  -u  update files, create if necessary      -z  display archive comment
  -x  exclude files that follow (in xlist)   -d  extract files into exdir

modifiers:                                   -q  quiet mode (-qq => quieter)
  -n  never overwrite existing files         -a  auto-convert any text files
  -o  overwrite files WITHOUT prompting      -aa treat ALL files as text
  -j  junk paths (do not make directories)   -v  be verbose/print version info
  -C  match filenames case-insensitively     -L  make (some) names lowercase
  -X  restore UID/GID info                   -V  retain VMS version numbers
                                             -M  pipe through "more" pager
Examples (see unzip.txt for more info):
  unzip data1 -x joe   => extract all files except joe from zipfile data1.zip
  unzip -p foo | more  => send contents of foo.zip via pipe into program more
  unzip -fo foo ReadMe => quietly replace existing ReadMe if archive file newer

Step 04

Use unzip command to extract the .zip file.

unzip wso2esb-4.8.1.zip


I will guide you on how to install IBM JDK in IBM AIX. 


Wednesday, October 14, 2015

Purging Cassandra data in WSO2 BAM 2.5.0


WSO2 BAM is capable of monitoring a wide range of business activities. BAM allows users to perform following operations to the data.
  • Aggregate
  • Analyze
  • Present
  • Purge

In this post I am going to talk about data purging task performed by BAM. It is really simple to schedule a data purging/deleting task in BAM 2.5.0. Follow the below steps to create a data deletion task.

Step 01

Download WSO2 BAM 2.5.0. navigate to <BAM_HOME>/bin and start the server using wso2server.sh script. Login using admin:admin credentials.

Step 02

Go to Configure tab in the left bar and you will get the following .


Add Archive/Purge Data.


Add the stream name and version which you need to delete data from. I have given the retention period as 1 day.

And here we can specify a cron expression which schedules the task. In my cron expression the task will trigger for each minute.
Please refer to the following table to get more information on cron expressions. And also please note that the we are using quartz scheduler cron expressions.

Field Name Allowed Values Allowed Special Characters
Seconds 0-59 , - * /
Minutes 0-59 , - * /
Hours 0-23 , - * /
Day of month 1-31 , - * ? / L W
Month 1-12 or JAN-DEC , - * /
Day of week 1-7 or SUN-SAT , - * ? / L #
Year empty, 1970-2099 , - * /

Monday, October 12, 2015

Using Federated Authentication in WSO2 IS 5.0.0


In federated authentication, WSO2 IS will not handle the authentication process. Thus it will be handled by an external applications such as Facebook, Google, Yahoo, Microsoft Windows Live etc. and send the response back to the Identity server. In this post I will guide you to use Facebook as federated authentication.

Step 01

Go to the URL https://developers.facebook.com/apps/ and login using your Facebook credentials. Add a new app using MyApps -> Add a new App. You will get the following popup window.
Click on the advanced setup to create the new application. Give the relevant information and click on Create App ID.


Then you will get an App ID and an App Secret for your app. Go to Settings tab and "Add a platform" as Web. Provide the site URL as https://localhost:9443/ ,  App Domain as localhost and save the changes.

Go to Advanced tab Client Auth Login and provide the Valid OAuth redirect URIs as https://localhost:9443/commonauth/

Step 02

Download WSO2 Identity Server from http://wso2.com/products/identity-server/ and start the server using wso2server.sh script located in <CARBON_HOME>/bin folder.

Add an identity provider with following configurations.

Basic information

Federated Authentication


Provide your Client ID and Client secret relevant to the created app. 

Claim configuration

Step 03

Add a Service provider using the following configurations.

Inbound authentication configuration > SAML2 Web SSO configuration

Basic information

Claim configuration

Local inbound and Authentication configuration


Step 04


Click on the first link (Click here to login with  SAML from WSO2 IS) and you will be redirected to Facebook login page. Login using Facebook credentials.


You will be now redirected to the travelocity application.

Sunday, September 27, 2015

Installing Websphere MQ 8 (IBM MQ) in Windows Virtual instance


Hi all,

This post will guide you to install IBM Websphere MQ version 8 on a Windows 7 Virtalbox instance. The reason for writing this post was the difficulty I have faced when installing due to the ambiguous documentations. Lets start installing.

Prerequisites

  • Virtualbox installed in your host machine and Windows 7 installed on it
  • IBM Websphere MQ version 7 download (Download it from here)

Installation

Step 01

Setting up the environment

Start the Win 7 instance and install Guest Additions as explained below. We need to follow this since we are going to share files between the host and the guest operating systems. 

  • Click on the Devices menu in the top most bar and select "Insert Guest Additions CD image". This will install the CD image in to the VM. Then go to My Computer and double click on the Guest Additions CD image to install.

  • Go to the settings menu in the Virtualbox and add a shared folder from your host machine. 

Copy the necessary files into the shared folder, so that you can access it from the VM.

Step 02

Installing IBM MQ

Go to the shared folder from your VM and select the IBM MQ installation file. Install IBM MQ as administrator, otherwise you will not have privileges to some operations.

Once the installation started, you can see the following wizard. In here, you can configure the network for either domain account or local machine account. I have used the local machine account, so that I have answered NO for the question.


Then you will be redirected to the following window. Click on Launch IBM Websphere MQ Installer.


Then agree the Licence agreement and continue with the default settings.


This will install IBM MQ 7.5 in your Windows instance. I will discuss the configurations of IBM MQ and using it with WSO2 ESB in my next posts.